


IoT locks make securing your home or business easier and smarter. These locks replace traditional keys with digital access methods like apps, codes, or biometrics. Installing one yourself can save money and time, but it requires the right tools, preparation, and attention to detail.
Here’s what you need to know to get started:
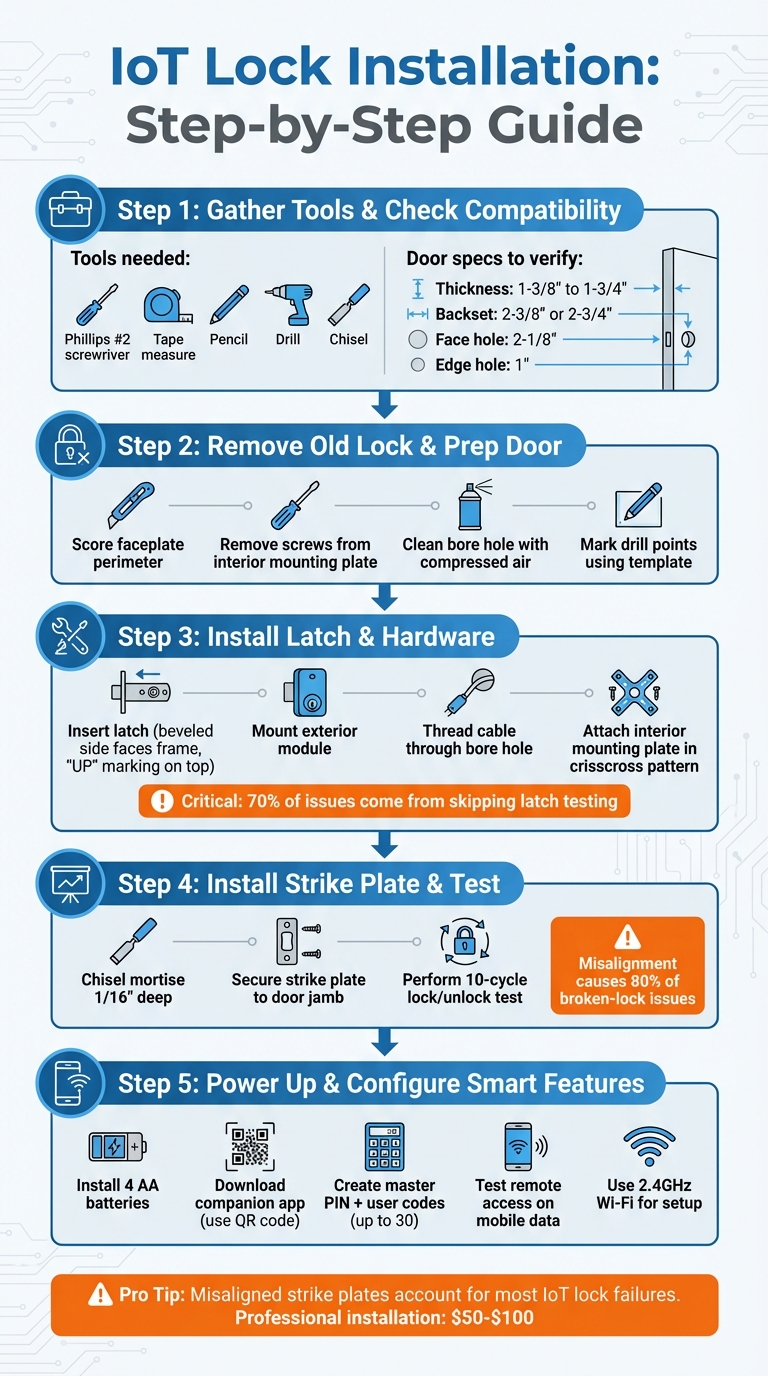
- Tools: A Phillips #2 screwdriver, tape measure, pencil, drill, and chisel are essential. Some kits may include templates or extra parts for alignment.
- Door Compatibility: Check your door’s thickness (1-3/8″ to 1-3/4″), backset (2-3/8″ or 2-3/4″), and hole sizes to ensure the lock fits.
- Key Steps: Measure and prep the door, remove the old lock, install the latch and hardware, and test alignment. Small misalignments can cause issues with functionality or drain batteries quickly.
- Smart Features Setup: Pair the lock with its app, create user codes, and test remote access. Ensure your Wi-Fi is 2.4GHz for smoother setup.
Proper installation ensures smooth operation and extends the lock’s lifespan. Test all features thoroughly after setup to avoid problems later. For complex setups or non-standard doors, professional lock installation service may cost $50–professional installation may cost $50–$10000, offering peace of mind.
Quick Tip: Misaligned strike plates or latches account for most issues, so double-check alignment during installation.
IoT Smart Lock Installation Process: 5 Essential Steps
Ditch Your Keys FOREVER! Smart Lock Installation Made Easy
sbb-itb-643e28e
Tools and Materials You’ll Need
Getting everything ready before you start is key to avoiding unnecessary delays. Most residential lock installations for IoT devices require simple household tools: a Phillips #2 screwdriver (preferably with a magnetic tip to prevent screws from falling into the door’s bore holes), a tape measure, and a pencil for marking spots accurately. A drill with the correct bits is also necessary to align the latch and strike plate properly. Many lock kits include extras like mounting templates or spacers to help you position the hardware correctly.
Basic Tools
Your everyday tools should be sufficient for the job. A Phillips #2 screwdriver with a magnetic tip is especially handy for keeping screws from dropping into inaccessible areas of the door. A tape measure helps you confirm door thickness and backset distance, while a pencil allows for precise marking when drilling. If the faceplate or strike plate sticks out, a chisel can be used to create a shallow recess (about 1/8″) so the hardware sits flush with the door. Additionally, having some compressed air on hand can help clear wood shavings or debris from the bore hole before installing the new hardware.
Lock Components
An IoT lock kit typically includes several key parts: the exterior keypad or reader, an interior assembly (housing the motor and electronics), a latch or deadbolt mechanism, a mounting plate, tailpiece adapters (often color-coded for different sizes), a strike plate, and mounting screws. Most locks are powered by 4 AA alkaline batteries – choose high-quality batteries to avoid leaks that could damage the internal electronics. Some models offer rechargeable USB-C battery packs or require a Wi-Fi bridge that plugs into a nearby outlet. Kits often include a mechanical backup key or an external emergency power option, like a 9V battery terminal, in case the main batteries fail. Having all these components ready ensures a smoother and more secure installation.
Door Compatibility Check
Before diving into the installation, check that your door meets the necessary specifications. Measure the door’s thickness at the deadbolt area (not the hinges, as doors can taper) – most IoT locks are designed for doors between 1-3/8″ and 1-3/4″ thick. Verify the backset distance (the space from the door’s edge to the center of the bore hole), which should be either 2-3/8″ or 2-3/4″. Around 95% of U.S. doors have standard hole sizes: a 2-1/8″ face hole and a 1″ edge hole. Also, confirm that the current deadbolt has a 1″ throw (extension length) to ensure the new latch properly engages with the strike plate. The door should close smoothly without the latch rubbing, as unnecessary friction can drain batteries faster and may lead to electronic malfunctions.
| Measurement | Standard Requirement |
|---|---|
| Door Thickness | 1-3/8″ to 1-3/4″ |
| Backset Distance | 2-3/8″ or 2-3/4″ |
| Face Hole Diameter | 2-1/8″ |
| Edge Hole Diameter | 1″ |
| Deadbolt Throw | 1″ extension |
With your tools, components, and door measurements squared away, you’ll be ready to start the installation process confidently.
Preparing for Installation
Measuring Your Door
Start by carefully measuring your door’s dimensions. Focus on the door thickness specifically where the deadbolt will be installed – not near the hinges – since doors can warp or taper over time. Double-check the thickness, backset, and bore hole dimensions as outlined earlier. Additionally, identify your door’s handing (whether it’s left- or right-handed). To do this, stand on the side where the door swings toward you. If the hinges are on your left, it’s a left-handed door; if they’re on your right, it’s right-handed. Ensuring the latch’s angled side faces the correct direction is key for smooth operation when the door closes. Misalignment between the deadbolt and the door frame accounts for 80% of broken-lock issues, so precision here is essential, as seen in our professional lock installations.
Once you’ve confirmed all measurements, you can move on to removing the existing lock.
Removing the Old Lock
Before removing the old lock, score the faceplate’s perimeter with a utility knife or razor blade to protect your door’s paint from peeling. Use a Phillips #2 screwdriver to remove the screws on the interior mounting plate and then detach the exterior assembly. If the lock feels stuck, insert a screwdriver into the screw holes and gently tap it with a hammer – be careful not to forcefully pry against the door.
To keep everything organized, store the removed screws and hardware in a magnetic bowl or a small sandwich bag so nothing gets misplaced. After removing the lock, clean out the bore hole using compressed air or a vacuum to clear away wood shavings and dust. This step ensures a smooth and secure installation. If your door has a mortise lock (recognizable by a long rectangular metal plate on the edge of the door), be aware that standard IoT locks won’t fit unless you make significant modifications or choose a mortise-compatible model.
Marking Drill Points
Once the old lock is removed and the area is cleaned, it’s time to mark new drill points. Use the dimensions you’ve already verified to position the template accurately. Most IoT lock kits include a paper template that shows exactly where to drill. Tape this template securely to the door at the correct horizontal line to keep it from shifting during the process.
Typically, deadbolts are installed 6 to 12 inches above the doorknob – or roughly 44 inches from the bottom of the door. Mark this horizontal line on the door edge as well as on the interior and exterior faces to pinpoint the center of the installation. To mark the strike plate location on the doorjamb, close the door and use a pencil to mark where the latch bolt touches the frame. This will indicate exactly where the bolt meets the doorjamb.
When drilling the 2-1/8″ bore hole, drill until the pilot bit emerges from the other side of the door. Then, switch to the opposite side and finish drilling from there. This method prevents wood chipping and ensures a clean finish.
Installing the Lock Hardware
With your measurements and drill points ready, it’s time to install the hardware.
Installing the Latch
Start by inserting the latch into the hole on the door’s edge. The beveled side should face the door frame, and the "UP" marking must be oriented upward. The faceplate should sit flush with the door surface – if it sticks out more than 1/16 inch, carefully chisel a shallow mortise to correct it.
Secure the faceplate using the provided screws. Tighten them just enough to hold firmly without cracking the wood or misaligning the latch. Before moving on, use a flathead screwdriver to manually test the latch by rotating the tailpiece slot. This ensures the bolt moves smoothly. Skipping this step is responsible for 70% of post-installation issues, so don’t overlook it.
Mounting the Exterior and Interior Parts
Place the exterior module (like a keypad or handle) on the outside of the door. Guide the connecting cable through the bore hole to the interior side, being careful not to bend the cable more than 90 degrees to prevent wire damage.
On the interior side, thread the cable through the designated slot in the mounting plate. Most plates include a specific slot or hook to keep the cable secure and prevent pinching. Align the mounting plate so its arrow points toward the door edge where the latch is installed. Insert the long mounting bolts and tighten them gradually in a crisscross pattern, turning each bolt about 1/4 turn at a time. This ensures the hardware stays even and avoids warping.
Securing and Testing the Hardware
Once the mounting plate is firmly in place, attach the interior module. Connect the cable to its adapter, ensuring it sits securely in the cable hook to avoid interference with the lock’s mechanics. Align the interior module with the latch hole – this is crucial for smooth operation. If the shaft doesn’t align properly, adjust the screws to reposition it before tightening everything firmly.
Manually test the deadbolt before installing batteries. The bolt should move smoothly without resistance. If you notice binding or scraping, check if the door is level within its frame – misaligned doors are a frequent cause of smart lock malfunctions. Also, ensure the strike plate is perfectly centered where the bolt meets the frame. Even a slight offset, as small as 1/16 inch, can lead to "lock jammed" errors in the app later.
| Component | Critical Check | Common Mistake |
|---|---|---|
| Latch | Bevel faces frame; "UP" on top | Installing upside down, jamming bolt |
| Mounting Plate | Arrow points toward door edge | Arrow facing hinges, misaligning module |
| Strike Plate | Centered where bolt hits frame | Offset by 1/8 inch, causing app errors |
Once everything works smoothly, you’re ready to power up the lock and complete the setup.
Powering Up and Testing
Now that your hardware is securely in place, it’s time to power up your IoT lock and ensure everything works smoothly before diving into the electronic lock installation and digital setup.
Installing Batteries
Start by inserting 4 AA batteries, making sure to match the polarity markings. You should hear a beep or see a flashing indicator, signaling that the lock is powered up. If you notice a flashing light right away, it could mean there’s an issue – like a faulty battery, low power, or a loose connection. In this case, swap out the batteries with high-quality replacements to avoid interruptions. Before closing the battery compartment, check for any setup or pairing codes printed inside the cover. These codes will be essential for the digital lock installation and smart setup later on. Keep them handy!
Testing Manual Operation
Once the lock is powered, check its mechanical functionality. Start with the door open and test both the interior thumbturn and the external key. They should turn smoothly without any resistance. This ensures that the internal components are functioning properly.
Next, close the door and repeat the test. The deadbolt should slide easily into the strike plate without requiring extra force. If you feel resistance, adjustments will be necessary to prevent future issues.
Installing the Strike Plate
After confirming the lock operates smoothly, it’s time to secure the strike plate. Use a pencil to mark the strike plate’s center on the door jamb. Then, chisel a mortise about 1/16 inch deep, pre-drill pilot holes (making them 75% of the screw diameter), and attach the strike plate. Misaligned or shallow mortises are a common cause of binding issues, which can lead to motor failure within weeks.
To ensure everything is aligned, perform a 10-cycle test by locking and unlocking the door repeatedly. If you notice resistance, carefully deepen the mortise by 1/32 inch at a time until the deadbolt moves freely. Proper alignment here is crucial – it not only ensures smooth operation but also helps prevent long-term damage to the lock’s motor.
Setting Up the Smart Features
After installing the lock’s hardware and confirming it works mechanically, the next step is to activate its digital features. This involves pairing the lock with your smartphone and enabling remote access.
Downloading and Pairing the App
Start by downloading the lock’s companion app from your device’s app store. Use the QR code located in the battery compartment or manual to create an account and link your lock. Interestingly, downloading the app before physical installation can help avoid up to 95% of common setup issues, thanks to model-specific videos and step-by-step guidance provided in the app. Scanning the QR code ensures the app correctly identifies your lock model – important since incorrect identification causes 40% of pairing failures.
Before pairing, make sure Bluetooth is on and temporarily disable Wi-Fi (especially 5GHz networks) to minimize interference. Keep your phone within about 30 feet of your Wi-Fi router during setup. Most smart locks require a 2.4GHz network, as 5GHz connections can disrupt the process. Once you initiate pairing, give the lock up to 90 seconds to confirm the connection via its LED indicator. If the process keeps failing, try holding the reset button for 10–15 seconds to restart.
Creating User Codes
With the app successfully paired, your next task is setting up a master PIN. This code acts as the primary credential for managing guest access and other features. Security expert Mia Wang from Vanma advises:
"This master credential should be strong, unique, and known only to the main person or people responsible for security".
Many smart locks can store up to 30 unique access codes. Use the app to assign clear labels to each code, like "Dog Walker" or "Housekeeper", for easy tracking of access logs. Some advanced locks even allow you to set specific access rules, such as restricting a contractor’s code to weekdays between 9:00 A.M. and 5:00 P.M. To maintain security, review active codes periodically and revoke any no longer in use.
Testing Remote Access
With your codes ready, it’s time to test the lock’s remote functionality. Switch to mobile data, open the app, and try locking and unlocking the door to confirm the cloud connection is working smoothly. Test the lock by cycling it three times – both manually and through the app. If you’re integrating the lock with platforms like SmartThings, Alexa, or Z-Wave, follow the specific inclusion steps for your chosen hub. Once connected, you’ll be able to control the lock using voice commands or automated routines.
Conclusion
Installing IoT locks can be a smooth process with the right preparation. Start by measuring your door’s thickness, confirming backset dimensions, and ensuring the borehole is compatible with the lock you plan to purchase. Once you’ve verified the fit, align all components correctly and test each step of the installation.
Even small misalignments – like a latch installed at the wrong angle or a strike plate that’s slightly off-center – can strain the motor, drain batteries faster, and reduce the lock’s lifespan. As Mia Wang, a Security-Technology Specialist at LockManage, explains:
"A well aligned door allows the electronic motor to work with less effort, which reduces wear and helps batteries last longer".
After installation, test the lock thoroughly. Check manual operation, keypad functionality, and remote app controls to ensure everything works seamlessly. If alignment proves tricky, seeking professional help can save time and ensure long-term reliability.
In some cases, professional expertise is the best route. Non-standard doors, intricate smart home setups, or advanced commercial systems can benefit from a trained technician’s skills. Labor costs for professional installation typically range from $50 to $100, which can be a worthwhile investment for complex projects.
For residents in Pittsburgh, PA, Sherlock’s Locksmith offers a full range of smart lock installation services. Their certified technicians handle everything from on-site assessments and hardware setup to client training on advanced features. Whether you’re upgrading a single door or managing a large-scale access control system, they ensure your IoT lock is installed to meet industry standards and provide ongoing support.
FAQs
How do I know if my door is compatible with an IoT lock?
To determine if your door works with an IoT lock, start by measuring its thickness – most doors fall between 1-3/8 inches and 1-3/4 inches. Next, check the type of deadbolt you have, such as a single-cylinder deadbolt, and compare these details with the lock’s specifications. Taking these steps in advance can help you avoid installation problems and ensure the lock functions properly once installed.
Why does my smart lock bind or jam after installation?
Your smart lock might jam or bind because of alignment problems, door fit issues, or friction. This often happens due to things like a stiff deadbolt, screws that aren’t lined up correctly, or a poor fit in the door’s borehole. To avoid these problems, make sure the lock is aligned correctly, confirm it fits your door properly, and ensure the deadbolt moves smoothly without anything blocking it.
Do I need a hub or 2.4GHz Wi-Fi for remote access?
To use remote access with a smart lock, you’ll usually need one of two things: a hub or a 2.4 GHz Wi-Fi connection. Many modern smart locks can connect directly to 2.4 GHz Wi-Fi, eliminating the need for a hub. However, a strong and reliable connection is crucial to ensure everything works smoothly. Always review your smart lock’s specifications to understand its exact requirements.