


Smart locks simplify home security by letting you control access remotely through your smartphone. They eliminate the hassle of keys and offer features like temporary access codes, activity logs, and integration with other smart home devices. Prices range from $100 to $300, with installation costing an additional $50 to $100. Here’s a quick guide to help you install one:
- Check compatibility: Ensure your door fits standard measurements (e.g., door thickness: 1⅜"–1¾").
- Gather tools: A Phillips screwdriver, measuring tape, and possibly a chisel are essential.
- Download the app: Most smart locks require their app for setup and calibration.
- Follow installation steps: Remove the old lock, install the new one, and test all features.
- Set up digital features: Connect to Wi-Fi, create PINs, and enable functions like auto-locking and geofencing.
For a seamless setup, test all entry methods and ensure proper alignment of the lock and strike plate. Misalignment is the most common issue, leading to jamming or battery drain. If you’re unsure, professional installation is an option.
How to Install a Smart Lock and Deadbolt | How To Anything
Before You Start: Pre-Installation Checklist
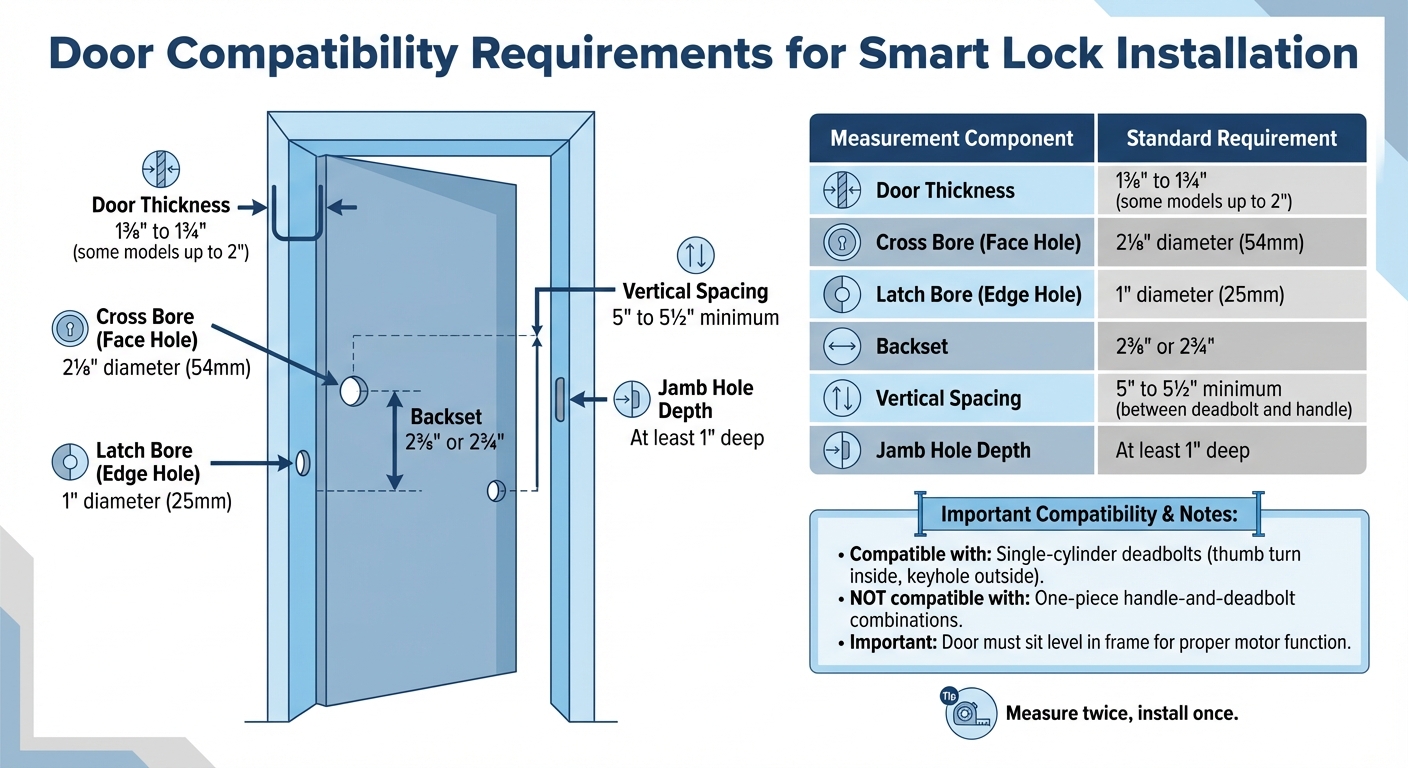
Smart Lock Door Compatibility Requirements and Measurements Guide
Before you take out your old lock, make sure everything is in order. Confirm your door’s compatibility and gather the tools you’ll need. Most DIY installations are quick, often taking less than 30 minutes. This preparation sets the stage and ensures a smooth transition to the actual installation.
Check Your Door Compatibility
Start by measuring your door carefully. Most smart locks are designed to fit single-cylinder deadbolts – the kind with a thumb turn on the inside and a keyhole on the outside. They typically won’t work with one-piece handle-and-deadbolt combinations.
Here’s what to measure:
- Door thickness: It should be between 1⅜ inches and 1¾ inches. Some models can accommodate doors up to 2 inches thick.
- Main cross bore (face hole): This should be 2⅛ inches in diameter.
- Latch bore (edge hole): This needs to be 1 inch in diameter.
- Backset: The distance from the door edge to the center of the borehole must be either 2⅜ inches or 2¾ inches.
- Vertical spacing: You’ll need at least 5 to 5½ inches between the center of the deadbolt hole and the door handle hole.
- Jamb hole depth: The hole in the door jamb should be at least 1 inch deep to allow the deadbolt to fully extend.
Lastly, check if your door sits level in its frame. If it doesn’t, the motor in the smart lock might struggle, or the deadbolt could fail to latch properly.
| Measurement | Standard Requirement |
|---|---|
| Door Thickness | 1⅜" to 1¾" (some up to 2") |
| Cross Bore (Face Hole) | 2⅛" (54mm) |
| Latch Bore (Edge Hole) | 1" (25mm) |
| Backset | 2⅜" or 2¾" |
| Vertical Spacing | 5" to 5½" minimum |
| Jamb Hole Depth | At least 1" deep |
Gather Your Tools and Materials
You won’t need any specialized tools for this job. A Phillips head screwdriver is a must for removing the old lock and installing the new one. Keep a measuring tape nearby to double-check dimensions, and have some painters tape handy to hold the exterior keypad in place while you secure the interior mounting plate.
Most smart lock kits come with everything you need, including the exterior keypad, interior assembly, mounting plate, deadlatch, strike plate, and screws. However, you’ll likely need to provide your own batteries, as many locks require four AA alkaline batteries. If the strike plate included in your new lock is larger than your old one, you may need a chisel to adjust the door frame. Once you’ve gathered your tools, you’re ready to move forward.
Download the App Before Installing
Before you begin the installation, download the lock manufacturer’s mobile app and log in. Many apps include step-by-step installation videos to guide you through the process. Some smart locks even require the app to be connected during the hardware installation.
Having the app ready will also make pairing the device easier once you insert the batteries. This step is critical during the lock’s calibration phase. Additionally, the app may prompt you to install firmware updates when you first connect, so make sure you have a stable Wi-Fi connection. With the app downloaded and your account set up, you’re all set to start the installation process.
Installation Steps
Now that your door is prepped and your tools are ready, it’s time to install your smart lock. This involves removing the old lock, installing the new components, and powering it up to ensure everything works as it should. Follow these steps carefully for a secure setup.
Remove Your Old Lock
Start by working on the interior side of the door. Remove the screws holding the interior thumb-turn in place, then pull the exterior key assembly away from the door. To avoid damaging the hardware, use painter’s tape to temporarily hold the exterior assembly in place.
Next, locate the two screws on the door edge that secure the deadbolt assembly. Make sure the deadbolt is retracted (unlocked) before unscrewing these. Once loosened, pull the deadbolt assembly straight out from the edge of the door. Lastly, unscrew and remove the old strike plate from the door frame.
Install the Smart Lock Components
Begin by inserting the new deadbolt into the edge hole of the door. Keep the bolt retracted and ensure any arrow or indicator on the deadbolt is facing upward. Secure it using the screws provided in the kit.
On the exterior side of the door, position the keypad assembly and feed its electrical cable through the bore hole, usually below the deadbolt. Use tape to hold the keypad in place temporarily. On the interior side, guide the cable through the slot in the mounting plate, then attach the plate to the keypad using the long through-bolts supplied with your lock. Once the mounting plate is secure, connect the ribbon cable to the adapter on the interior housing. Align the interior shaft with the latch hole, then fasten the housing to the mounting plate using the smaller machine screws.
If the new strike plate doesn’t fit flush in the door frame, you may need to use a chisel to adjust the recess. Throughout the process, keep the deadbolt retracted and ensure any indicators remain correctly aligned.
Add Power and Test the Lock
Insert the required batteries – most smart locks use four AA batteries – and ensure they’re installed correctly. If the lock comes with pre-installed batteries, simply remove the plastic isolation tab to activate the power. Once powered, secure the battery cover or faceplate.
Before finalizing, test the lock manually. Turn the interior thumb-turn to extend and retract the deadbolt. The movement should be smooth and free of resistance. If the deadbolt sticks, check for over-tightened mounting screws or a misaligned strike plate. Always perform this test with the door open to avoid accidentally locking yourself out.
If the deadbolt works smoothly when the door is open but sticks when closed, the strike plate alignment likely needs adjustment.
sbb-itb-643e28e
Set Up the App and Smart Features
Once your smart lock hardware is installed, it’s time to connect it to your smartphone and unlock all its digital features.
Connect the Lock to Your Phone
After completing the physical setup, open the app that corresponds to your smart lock. Start by creating an account using your email – this will allow you to manage settings and control access. Once you’re logged in, add your lock to the app. Many modern smart locks make this step easy with a QR code, often located on the battery cover or inside the packaging. Simply scan it to pair the lock. If there’s no QR code, you can usually press a pairing button on the lock to connect via Bluetooth.
Keep your phone within 30 feet of the lock to ensure a stable connection during setup. For locks with Wi-Fi capabilities, the app will prompt you to select your home network and input the password. Some systems, such as Nest Yale locks, might require an additional Wi-Fi bridge or hub for remote access. Before completing the setup, check that your Wi-Fi signal is strong enough to reach your door to avoid potential connectivity issues.
Give your lock a name, like "Front Door" or "Garage Entry", to make notifications and voice commands more intuitive. If you plan to use voice assistants such as Amazon Alexa, Google Home, or Apple HomeKit, link the app to your preferred platform during this step.
Activate Key Features
Start by setting up a master PIN. This serves as your primary access code and is required before adding any secondary codes. Many smart locks allow you to create multiple user PINs – some models, like those from AAA Smart Home, can support up to 100 unique codes. Permanent codes are ideal for family members, while temporary codes can be assigned to guests, contractors, or even dog walkers. These temporary codes automatically expire after a set time, saving you the hassle of manually deleting them.
Enable the auto-lock feature to ensure your door locks itself after a specified time, typically ranging from 30 seconds to 5 minutes. This adds an extra layer of security by preventing you from accidentally leaving the door unlocked. Turn on tamper alerts to get instant notifications if someone tries to force the lock or repeatedly enters incorrect codes. You can also activate the event log to track who enters and exits your home.
If your lock supports geofencing, configure it so the door locks automatically when your phone moves outside a certain range and unlocks when you return. For models with biometric scanners, program multiple fingerprints to allow quick, keyless entry – perfect for when your hands are full. Make sure to enable automatic software updates in the app to keep your lock secure with the latest patches. Also, set up low-battery notifications to avoid being caught off guard when the power runs low.
"The mobile application is your smart lock’s home away from home that lets you perform all these wonderful capabilities." – Security.org
Finally, test all remote functions to confirm everything is working as expected.
Testing and Troubleshooting
Test All Entry Methods
Before securing the door, make sure to test all the ways you can unlock it. Start by manually turning the interior thumbturn – this should move the deadbolt smoothly, without sticking or resistance. Next, try out the keypad, the remote app, and the backup key to confirm everything functions as it should.
Let the calibration cycle finish completely without interruptions. It’s best to perform these initial tests with someone else inside the house, just in case.
If you encounter any problems during these tests, take a look at the troubleshooting tips below.
Fix Common Installation Problems
Misalignment is responsible for 80% of smart lock issues. If the deadbolt feels stuck, the strike plate might not be lined up correctly. Start by tightening the screws on your door’s hinges – this can often realign the door with the frame. If that doesn’t solve the issue, adjust or file the strike plate to let the deadbolt move freely.
"Think of your deadbolt like a muscle – if it’s misaligned, no amount of strength will fix it." – Rafa Santos, Founder, Lock Smart Living
Connection issues are often caused by Wi-Fi or Bluetooth interference. Restart your router and toggle your phone’s Bluetooth on and off. If the lock still doesn’t connect, ensure your phone and the lock are on the same network. Flashing indicator lights usually point to low battery power or loose wiring. Avoid overtightening the mounting screws, as this can cause binding. If you notice a gap between the lock and the door, slightly loosen the screws to relieve tension. Also, check for firmware updates in the app right after installation, especially if the lock seems unresponsive from the start.
Conclusion
Installing a smart lock on your own can save you between $50 and $100 in labor costs, but getting it right is crucial for both security and performance. Misalignment during installation can cause the lock to jam, drain the batteries faster, and even weaken your home’s security. A simple tip to enhance security is using 3-inch screws in the strike plate, which helps reinforce the door against forced entry.
The complexity of smart lock installations can vary widely. These devices are among the trickiest IoT products to set up, often taking 30 to 60 minutes – or longer if alignment issues arise. If your door has an unusual design, uneven frames, or if you lack the right tools, the risk of damaging the lock or compromising your home’s security increases significantly. Careful setup and thorough testing are critical to ensure everything works as intended.
If you’d rather skip the hassle, professional installation is a great option. Sherlock’s Locksmith provides expert smart lock installation services across Pittsburgh, PA. Their certified technicians are available 24/7 to handle alignment problems, compatibility concerns, and other issues, ensuring your smart lock is securely installed and functioning exactly as it should.
FAQs
What can I do if my smart lock doesn’t align with the strike plate?
If your smart lock’s latch isn’t lining up with the strike plate, don’t worry – it’s a common issue with a few straightforward fixes. Start by identifying where the bolt is missing the mark. Slowly close the door and observe whether the bolt is hitting too high, too low, or off to the side. Once you’ve pinpointed the problem, check the screws on the hinges and strike plate. Loose screws can throw off the alignment, so tighten them up first.
If that doesn’t solve the issue, you may need to adjust the strike plate itself. Loosen its screws, shift the plate slightly to align it with the bolt, and then secure it back in place. For more stubborn cases, you can use a metal file or drill to carefully enlarge the hole in the strike plate, ensuring the bolt moves freely.
Sometimes, the door frame may have shifted over time, causing the misalignment. In this case, shimming the hinges or repositioning the strike plate might be necessary. After making these adjustments, test the lock by locking and unlocking it a few times to confirm everything is working properly.
Still having trouble? It might be time to call in a professional. Sherlock’s Locksmith in Pittsburgh offers 24/7 mobile service and can realign your strike plate or suggest the best fix for your smart lock.
How can I make sure my smart lock is secure against break-ins?
To keep your smart lock secure, opt for a model that offers tamper-resistant hardware, 128-bit encryption, and two-factor authentication. Pair it with a reinforced deadbolt that includes anti-drill and anti-pick plates for extra defense. Features like real-time monitoring alerts can also help you stay on top of unusual activity and discourage break-ins. Don’t forget to update the lock’s firmware regularly to ensure it stays protected against new threats.
What features should I set up after installing a smart lock?
After installing your smart lock, take a few extra steps to make the most of its features and keep your home secure. Start by configuring the auto-lock timer – this ensures your door automatically locks after a set period, so you never have to worry about forgetting. Next, connect the lock to its smartphone app for easy remote access and management.
Set up digital access codes for family members or temporary codes for guests. If your lock supports it, consider adding biometric credentials for an extra layer of security. For even more convenience, enable geofence-based unlocking – this lets your door unlock automatically as you approach your home.
To take things up a notch, integrate the smart lock with your home automation system. This allows you to sync it with other devices, like lights or security cameras, for a more connected experience. Lastly, activate push notifications to receive real-time updates whenever the door is locked or unlocked, giving you greater control and peace of mind.