


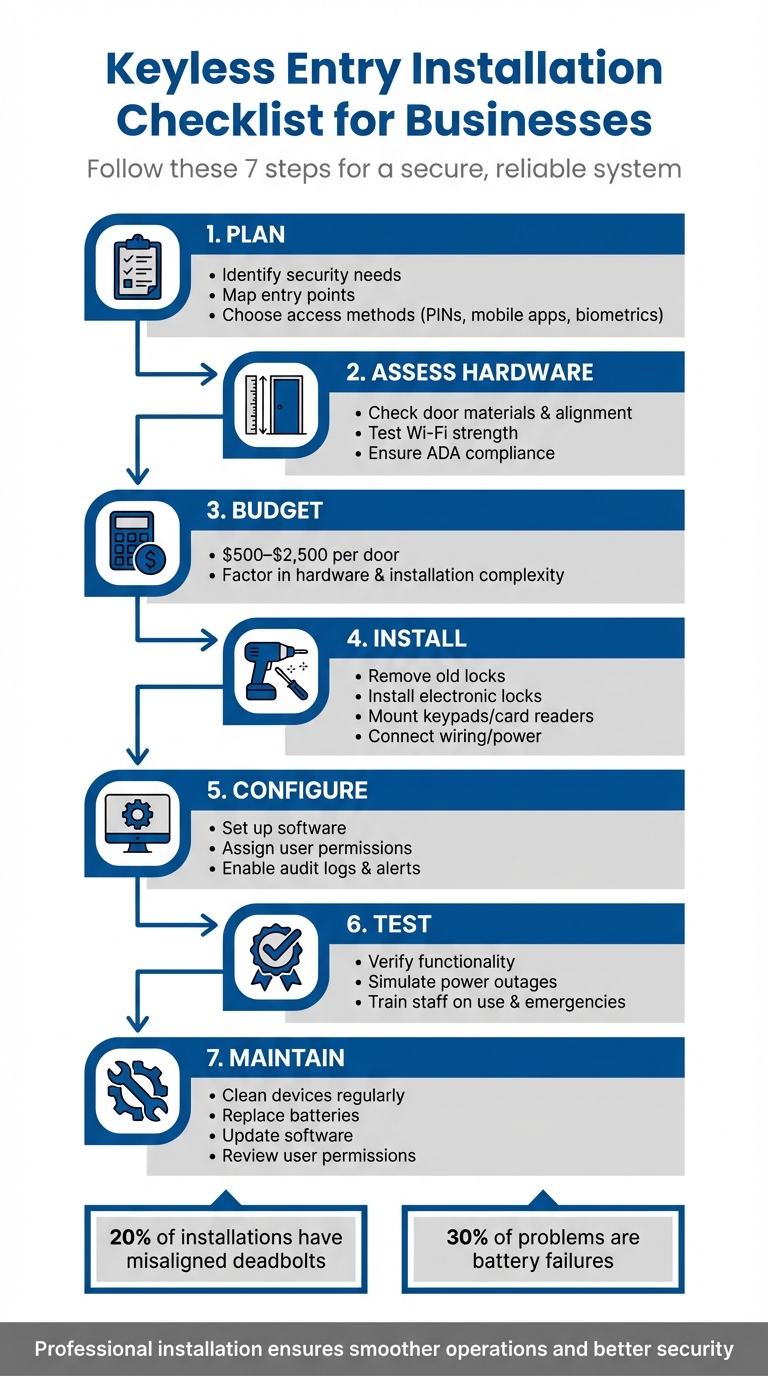
Keyless entry systems offer a modern, secure way to manage access to your business. By replacing traditional keys with digital options like PINs, key fobs, or biometrics, you can improve security, streamline access control, and monitor activity remotely. However, proper planning, installation, and maintenance are critical to avoid common issues like misaligned deadbolts (20% of cases) or battery failures (30% of problems).
Here’s a quick overview of the process:
- Plan: Identify security needs, map entry points, and choose the right access methods (e.g., PINs, mobile apps, or biometrics).
- Assess Hardware: Check door materials, alignment, and Wi-Fi strength. Ensure compliance with ADA standards.
- Budget: Costs range from $500–$2,500 per door, depending on the hardware and installation complexity.
- Install: Remove old locks, install electronic locks, mount keypads or card readers, and connect wiring or power sources.
- Configure: Set up software, assign user permissions, and enable monitoring features like audit logs and alerts.
- Test: Verify functionality, simulate power outages, and train staff on system use and emergency procedures.
- Maintain: Regularly clean devices, replace batteries, update software, and review user permissions.
Investing in a reliable system and following these steps ensures smoother operations and better security for your business. For expert help, consider professional locksmith services to handle complex installations or repairs.
7-Step Keyless Entry Installation Process for Businesses
Planning and Assessment Before Installation
Identify Your Security and Access Requirements
Start by mapping your property and marking all entry points that need controlled access. Separate areas with heavy foot traffic, like lobbies and break rooms, from more sensitive spaces such as server rooms, cash offices, or inventory storage. Each of these zones will require different levels of security and access methods to suit their purpose and risk level.
Make a list of all users who will need access – employees, vendors, contractors, and visitors – and assign specific access levels and time windows. For instance, cleaning crews might need access from 6–10 PM, while managers may require 24/7 entry privileges.
Next, choose access methods based on your security needs and budget. Here’s a quick breakdown of the options:
- PIN codes: Affordable but less secure since codes can be shared.
- Key fobs or cards: Offer medium security and are ideal for most office setups.
- Mobile credentials: Smartphone apps provide convenience, especially for tech-savvy businesses.
- Biometrics: High-security solutions like fingerprint or facial recognition are best for sensitive areas like data centers or pharmacies but come with a higher price tag.
| Credential Type | Best Use Case | Security Level | Cost Level |
|---|---|---|---|
| PIN / Keypad | General staff access | Low to Medium | Low |
| Key Fobs / Cards | High-traffic corporate environments | Medium | Medium |
| Mobile App | Modern offices, hotels, apartments | Medium to High | Medium |
| Biometrics | Sensitive zones like server rooms | High | High |
Before investing in any hardware, document your top three to five security goals. For example, you might aim to "create an audit trail for the server room" or "restrict warehouse access after 6 PM." Having clear objectives ensures you avoid unnecessary features and stay focused on what matters most.
Once your security needs are defined, it’s time to assess your existing doors and hardware.
Check Your Current Doors and Hardware
Inspect your doors to determine their material – wood, metal, fiberglass, or glass. Each material has unique installation requirements. For example, metal doors may need reinforced brackets, while fiberglass doors require careful drilling to avoid damage. Measure door thickness (commonly 1–1¾ inches) and backset distance (typically 2–2¾ inches) to confirm compatibility with electronic locks.
Check the door’s swing direction to ensure there’s enough clearance for installing keypads or card readers. Also, verify that door frames can securely support strike plates or magnetic locks. Doors with sagging frames or misalignment can lead to issues – about 20% of installations encounter deadbolt alignment problems.
Evaluate Wi-Fi strength at each entry point using a signal app, as wireless systems rely on stable connectivity for real-time management. If you’re considering wired systems, check for nearby power outlets or Power over Ethernet (PoE) ports, which provide a more reliable connection.
Decide whether your doors should unlock or remain locked during power outages. For example, fire exit doors typically use fail-safe locks to comply with fire codes, while high-security areas often require fail-secure locks for added protection. Ensure that mounting heights – usually between 34 and 48 inches from the floor – comply with ADA standards.
With your door conditions assessed, you’re ready to finalize your budget and timeline.
Establish Your Budget and Installation Schedule
Budgeting for a keyless entry system involves more than just hardware. Be sure to account for software licenses, wiring, and professional installation. For doors without existing electronic locks, installation costs range from $1,200 to $2,500 per door. Retrofitting existing electronic locks can significantly lower costs to $500–$1,500 per door.
Here’s a breakdown of typical costs:
- Electronic locks: $20 to $900 per unit
- Door readers: $80 to $1,200 per unit
- Software licensing fees: Around $600 annually for basic systems or monthly per-door fees
- Biometric systems: $3,500 to $10,000+ per door for high-security areas
"A detailed site survey is your single best tool for preventing scope creep and surprise costs." – Clouddle, Inc
Plan your installation timeline carefully to minimize business disruptions. Installing electronic locks typically takes 2–5 hours per door. For small businesses, the entire process – from site survey to system launch – usually spans about six weeks. This includes two weeks for planning and equipment procurement, one week for prepping infrastructure, one week for installation, one week for testing and user setup, and one final week for adjustments and go-live.
If your business operates continuously, schedule installations during off-hours or weekends. Choose a system that allows for incremental expansion so you can secure critical entry points first and add more doors as your budget allows.
DIY Access control install keypad Alarm Lock 1250 For Narrow frame aluminum glass storefront doors
Hardware Installation Steps
Now that the planning is done, it’s time to dive into the hardware installation process and bring your keyless entry system to life.
Remove Old Hardware and Install Electronic Locks
Gather the tools you’ll need: screwdrivers, a tape measure, a pencil, a level, chisels, a drill with a 3/8" masonry bit, wire strippers, a multimeter, mounting hardware, and fresh batteries.
Start by removing the old lock and deadbolt. Double-check the door thickness (standard sizes are 1-3/8" to 1-3/4") and the backset. If needed, adjust with shims to ensure a good fit.
Next, use the mounting template provided by the manufacturer. Place it on the door and mark the drill spots with a pencil. When drilling into wood, use a slow speed to avoid splitting. For metal doors, use stronger screws and reinforcement plates. After drilling, test the deadbolt several times to ensure everything lines up correctly.
Install the electronic lock assembly, ensuring the deadbolt aligns perfectly with the strike plate. Keep in mind that about 20% of installations may require hinge or strike plate adjustments to fix alignment issues. Use a level to confirm the lock is straight, then secure it with the provided screws. For exterior doors, consider adding weather stripping around the edges to protect the electronics from moisture.
| Tool Category | Essential Items | Purpose |
|---|---|---|
| Hand Tools | Screwdrivers, Chisel, Level | Remove old locks, adjust door edges, ensure proper alignment |
| Measurement | Tape Measure, Pencil | Mark drill spots, confirm door thickness/backset |
| Power Tools | Drill, Masonry Bits, Rotary Tool | Drill holes in wood/metal, smooth rough edges |
| Electrical | Multimeter, Wire Stripper | Test connections, prep wires |
| Supplies | Batteries, Mounting Templates, Shims | Power the lock, ensure a snug fit |
Mount Keypads, Card Readers, and Sensors
Install keypads and card readers on the door frame or wall next to the door, keeping them between 34 and 48 inches off the ground to meet ADA accessibility standards. Before drilling, use a level to ensure proper alignment.
For outdoor setups, choose weather-protected spots or add housings to shield devices from rain and extreme temperatures. If you’re installing RF-based devices like RFID or NFC readers, avoid placing them near heavy metal walls or power transformers, as these can interfere with radio signals.
Use anchors and screws suited to the wall material – whether it’s wood, metal, or glass. Be careful not to over-tighten screws, as this can crack plastic housings. Installing a single card reader typically takes 30 to 60 minutes. Once installed, test the device by checking for LED lights, audible beeps, and successful communication with the central controller.
Place door contact sensors at the top of the door frame to monitor whether the door is open or closed. Mount request-to-exit (REX) sensors above the door on the interior side. These sensors allow people to exit without credentials while maintaining accurate logs. Proper hardware installation lays the groundwork for smooth system operation.
Connect Wiring and Power Sources
Before drilling, plan the wiring routes carefully. Map out a clean path from each device – locks, readers, and controllers – to the central control panel or power source. Run cables through walls, above drop ceilings, or behind panels to keep them secure and out of sight.
Use low-voltage cables (like 18/2 or 22/4) for most systems, or CAT5e/CAT6 cables if your system supports Power over Ethernet (PoE), which combines power and data in one line. For grounding, make sure to sand the contact area down to bare metal for a solid connection.
Keep antennas and sensitive wiring away from speaker wires or large power transformers to minimize interference. Label each wire at both ends with its purpose and destination – this saves a lot of time when troubleshooting or performing maintenance later.
Check power and continuity at every connection using a multimeter or wire tester. For battery-powered locks, install fresh batteries and confirm that the 9V external bypass works in case the internal batteries fail – battery issues account for roughly 30% of electronic lock problems.
Choose the right type of lock for each area: fail-safe locks (which unlock during a power outage) are ideal for emergency exits, while fail-secure locks (which stay locked without power) are better for high-security areas like server rooms or cash offices. Once the wiring and power connections are verified, you’re ready to configure the system settings.
System Configuration and Software Setup
Once your hardware is installed and connected, the next step is to set up your system’s software to ensure smooth operation. This involves powering on the system, configuring access settings, and enabling security features.
Power On and Update the System
Start by connecting the controller to a power outlet and mounting it securely. Check the LED indicators on the controller to confirm it’s powered on and ready for setup.
Next, connect the system to your network. Most systems require either a 2.4GHz Wi-Fi connection or an Ethernet cable (Cat6 is recommended) for remote management and cloud features. If using Wi-Fi, test the signal strength at each door, and consider using extenders if the signal is weak. Log in to the administrative dashboard or mobile app to sync all hardware components, including locks, readers, and controllers, with the management software.
Check for firmware updates through the admin portal. Create a primary administrator account and verify its permissions before adding other users. Test the system’s response to power failures to confirm that doors default to the appropriate state – either unlocking (fail-safe) or staying locked (fail-secure), depending on your security needs.
| Component | Role | Key Consideration |
|---|---|---|
| Controller | The "Brain" | Connect to a UPS or battery backup to prevent downtime. |
| Reader | User Interface | Should be installed at ADA-compliant heights (34–48 inches). |
| Software/App | Management Hub | Sync devices and perform firmware updates. |
| Electronic Lock | Physical Security | Test for fail-safe or fail-secure operation during power loss. |
If the system doesn’t show a green checkmark or an online status during startup, try power cycling the device by unplugging it for 15 seconds. Modern controllers often include offline intelligence, storing user credentials locally to ensure functionality even if the internet connection is lost.
Configure User Access and Time Schedules
Log into the admin portal. Begin by organizing users into groups or roles, such as staff, vendors, cleaning crews, or tenants. This makes it easier to assign permissions in bulk rather than individually.
Define access permissions for each group, specifying which doors or zones they can enter based on their roles or security clearance. Set time-based access schedules, such as "weekdays only" or "after-hours access", and create temporary access windows for visitors or contractors. Assign credentials to each user, such as PINs, mobile apps, key fobs, or biometric data.
You can also configure automatic lock and unlock times (e.g., unlock at 8:00 AM and lock at 6:00 PM on weekdays). Set relay durations to determine how long a door remains unlocked after a valid credential is used. Choose a system that supports multiple credential types to provide backup options if a user loses their primary method.
"A lock system is only as good as the people managing it." – Chris Strauss, Owner, Great Valley Lockshop
For a smoother transition, schedule the system rollout on a Friday. This gives you the weekend to troubleshoot any issues before the workweek begins. The average total cost for a commercial keyless entry system, including the first year of operation, is approximately $3,850.
Activate Security and Monitoring Features
Once user access is configured, enhance your system’s security by enabling monitoring features. Turn on audit logging to automatically track every entry attempt. This helps monitor attendance, manage access to restricted areas, and maintain compliance records. Integrate access events with your video surveillance system so that incidents like forced doors trigger nearby cameras to record and send live feeds to security personnel.
Set up real-time alerts for unauthorized entry attempts, doors left open too long, or low battery warnings. Configure auto-lock timers or geofencing to automatically secure doors after a set period or when authorized users leave the area. Since about 25% of users encounter low battery issues, it’s crucial to monitor power levels.
During setup, test your system by intentionally forcing a door or leaving it open to ensure notifications are sent to your admin dashboard and mobile devices. Assign expiration dates for guest credentials. To protect against hacking, use strong encryption, multi-factor authentication, and secure network connections. Finally, connect Power over Ethernet (PoE) to an Uninterruptible Power Supply (UPS) to keep monitoring features operational during power outages.
Complete these steps before moving on to system testing.
sbb-itb-643e28e
Testing and Launch Procedures
Before rolling out your keyless entry system, it’s crucial to confirm that every component works as expected. A thorough post-installation check can prevent 34% of system failures, and data shows that over 90% of organizations encounter access control issues within six months of installation.
Verify All Doors and Access Devices Work Correctly
Start with a detailed physical inspection. Make sure control panels are securely mounted and properly grounded, ensure readers meet ADA standards, and check that outdoor devices are weatherproof. Pay particular attention to electric locks – misalignment is a common issue, occurring in roughly 20% of installations.
Next, test all credentials, both valid and invalid, to ensure the system responds correctly. Evaluate battery performance by running repeated cycles (20–30 consecutive operations). Verify integrations with other systems, such as fire alarms and manual overrides, to ensure they trigger the correct responses. Test Request-to-Exit (REX) devices by activating them from inside the building, confirming that the lock releases as expected and that the event is logged. Simulate power outages to test backup batteries. Fail-safe locks should unlock for emergency exits, while fail-secure locks should remain locked for areas like server rooms.
Additionally, check that door position switches accurately report their status and review the system dashboard to confirm that every swipe, exit, and alarm event is logged properly.
"The point of commissioning isn’t just to see what’s working. It’s about aggressively finding what isn’t while our technicians are still on-site."
– Clouddle, Inc
Conduct load testing during both peak and off-peak hours to identify any performance bottlenecks. Comprehensive system testing and power verification typically cost between $500 and $2,000.
Train Your Staff and System Administrators
Once the hardware is verified, focus on training the people who will operate the system. Separate training sessions should be held for system administrators and general staff.
For administrators, cover tasks like user profile creation, enrollment, permission settings, scheduling, audit reporting, and remote access management. Provide hands-on practice for critical tasks such as revoking credentials and pulling entry logs. Supply a complete handover package, including user manuals, wiring diagrams, device inventories, and support contacts.
For general staff, training should focus on authentication methods – whether using mobile apps, fobs, or PINs – and app setup. Teach them how to report lost credentials and emphasize good security habits, such as avoiding tailgating, which accounts for 61% of access control failures. Staff should also know what to do during power outages, how to use manual overrides, and the steps for emergency door releases. Clearly outline who to contact for minor issues versus technical malfunctions. Schedule the launch and training on a less critical day, like a Friday, to allow time for troubleshooting.
Track System Performance After Launch
During the first few weeks, monitor the system closely to catch any malfunctions, user errors, or areas needing improvement. Define performance metrics such as system uptime, response times, and communication reliability. Set up alerts for critical events like forced or propped doors and unknown credentials. Review audit logs daily during this period to ensure everything is functioning as intended.
Pay attention to incidents like tailgating or piggybacking, which may indicate the need for additional training. Confirm that controllers make accurate access decisions even during internet outages, storing events locally and syncing them once connectivity is restored. Collaborate with the installer to quickly address any lingering hardware or software issues. When systems are monitored effectively, 71% of organizations report five or fewer serious security incidents annually.
"Systematic post-installation verification transforms fresh installations into reliable security infrastructure by catching problems before they cause failures."
– Action1st
With thorough testing, proper training, and diligent tracking, your keyless entry system will be ready for dependable, long-term operation.
Maintenance and System Review
Regular upkeep is essential to keep your keyless entry system running smoothly and securely. Neglecting maintenance can lead to failures, with battery issues alone responsible for about 30% of lock malfunctions. By staying proactive, you can avoid these problems and ensure your system performs optimally for years to come. Here’s how to stay on top of it.
Inspect and Clean Hardware Regularly
Make it a habit to clean keypads, card readers, and biometric scanners every month. Use a soft, lint-free cloth and a mild cleaning solution recommended by the manufacturer. Harsh chemicals or abrasive cleaners can damage sensitive surfaces, especially on biometric devices.
Every six months, check the batteries in your locks, and for coin cell batteries like the CR2032, replace them annually. Many systems have LED indicators or audible alerts for low battery levels, so pay attention to these warnings to avoid unexpected lockouts. Also, inspect the wiring for fraying or damage, particularly in busy areas where wear and tear is more likely. Environmental factors like humidity can cause door frames to swell or warp, leading to alignment issues with deadbolts – something that affects about 20% of installations. To prevent this, lubricate hinges and make sure the deadbolt fits properly into the strike plate.
Keep Software Updated and Manage Access Permissions
Keeping your system’s software up to date is crucial for security. Enable automatic updates if possible, or manually install patches on a monthly basis to guard against vulnerabilities. Review access logs and permissions just as frequently, removing inactive users promptly to maintain control over who can enter your premises.
Backing up your system data, including access logs and user credentials, is another critical step. This ensures you won’t lose important information if a software issue arises. Additionally, check that all entry points are secure and confirm that all credential methods – like PINs, fobs, and mobile apps – are functioning as they should. If you encounter persistent software glitches or integration problems, don’t hesitate to reach out to a professional.
When to Call a Professional Locksmith
While many maintenance tasks can be handled internally, some situations call for expert help. Certified locksmiths are your go-to for handling complex wiring, multi-door integrations, persistent alignment issues, or system migrations. Professionals manage about 70% of intricate repairs to ensure systems remain reliable.
If you’re in Pittsburgh, PA, Sherlock’s Locksmith offers a full range of commercial locksmith services. From installing and maintaining security systems to providing emergency repairs, their certified technicians are available 24/7. Scheduling quarterly inspections with experts like them can help you catch hardware issues early and keep your warranty intact.
Conclusion
This checklist walks you through the essential steps for planning, installing, and maintaining a keyless entry system. A well-executed installation not only enhances security but also provides the convenience your business needs. Every stage – from evaluating your site to pinpoint high-traffic and sensitive areas, to testing all access methods before going live – lays the foundation for a system that performs reliably over time.
Careful planning is crucial to addressing vulnerabilities. With the global access control market expected to surpass $28.41 billion by 2035, businesses that focus on proper installation and maintenance will be better positioned to counter security risks and make the most of their investment. Partnering with professionals can mean the difference between a system that runs smoothly and one that causes constant issues. Whether it’s mounting keypads, setting up user permissions, or scheduling regular maintenance, expert assistance ensures your system operates without a hitch.
The steps outlined here are designed to help you establish a dependable keyless entry system. Ready to enhance your business’s security? Sherlock’s Locksmith offers expert keyless entry services tailored to your needs. Their certified technicians, available 24/7 across Pittsburgh, PA, handle everything from installation and configuration to ongoing maintenance and emergency support. With a stellar 4.9/5 rating on Google from 122 reviews, they’re a trusted choice for businesses seeking top-tier service and technical expertise.
Don’t wait – contact Sherlock’s Locksmith today to ensure your keyless entry system provides the long-term security your business deserves.
FAQs
What are common challenges to look out for when installing a keyless entry system?
When setting up a keyless entry system, there are a few hurdles you might encounter along the way. Here are some common issues to keep in mind:
- Weak or dead key fob batteries: If the battery is running low, the system might not work as expected.
- Signal interference: Nearby electronics or certain building materials can mess with the signal, causing disruptions.
- Programming errors: Incorrectly programmed key fobs or keypads can lead to operational problems.
- Wiring issues: Faulty wiring or poor ground connections can result in system malfunctions.
- Worn-out key fob buttons: Over time, buttons can become damaged or less responsive, affecting reliability.
To minimize these problems, make sure every component is properly installed and tested. Routine maintenance is also key to keeping your system in good working order.
What’s the best way for businesses to choose a keyless entry system?
To select the best keyless entry system for your business, start by assessing your security requirements, budget, and the daily flow of people through your facility. Conducting a site survey is a smart first step – it allows you to evaluate entry points, current door hardware, and any power or network needs. This groundwork helps you narrow down systems that are compatible with your setup and meet your operational demands.
Next, think about the type of credentials you’ll use. Keypad codes are typically more affordable but don’t provide the same level of security as other options. RFID cards or key fobs add an extra layer of protection with encryption and access logs. If flexibility and remote control are priorities, mobile app-based or Bluetooth systems could be a fit, though they often depend on Wi-Fi or cellular connectivity. You might also want to explore features like multi-factor authentication, scalability for future growth, and integration with your existing IT or building management systems.
Don’t forget to factor in the total cost of ownership. This includes not just the upfront price of hardware and installation, but also software subscriptions and potential future upgrades. It’s also a good idea to test how user-friendly the system is for both employees and visitors. For professional guidance, installation, and compliance with safety codes, consulting a trusted expert like Sherlock’s Locksmith can help ensure the system is a perfect match for your business.
How can I properly maintain a keyless entry system for my business?
To keep your keyless entry system running smoothly, it’s important to stay on top of regular maintenance. Begin by checking all the hardware – this includes keypads, readers, and wiring – for any signs of wear or damage. Make sure everything is securely installed, and replace any parts that aren’t functioning as they should. Test each entry point to ensure locks, sensors, and readers are operating as expected, and confirm that backup power systems are ready to go.
Don’t forget about software updates. Make sure the system’s software or firmware is updated to the latest version. While you’re at it, review access logs to identify any irregularities. It’s also wise to conduct an audit of user access permissions. Remove any outdated accounts and adjust roles as needed to maintain security. Keep a record of all maintenance activities, and set up a schedule for routine inspections to keep things running reliably.
Need help? Sherlock’s Locksmith offers professional services to ensure your keyless entry system stays in excellent condition.